Showing posts with label sm. Show all posts
Showing posts with label sm. Show all posts
Friday, September 9, 2016
Tutorial Flash Samsung Galaxy Young 2 SM G130
Tutorial Flash Samsung Galaxy Young 2 SM G130

- Berikut alat flash yang harus di download sebelum melakukan Flash update :
- Usb driver disini atau samsung kies disini
- Odin v3 disini
- Firmware Galaxy Samsung Galaxy Young 2 SM-G130 disini
Jika Alat tempur siap, ikuti panduan ini dengan benar :
- Install Usb Driver samsung atau samsung kies di Computer kamu.
- Extrack firmware win rar archive Samsung Galaxy Young 2 SM-G130 dengan win rar hingga ada file .md5
- Matikan galaxy kamu. tekan dan tahan tombol Vol bawah+Home+Power hingga muncul download mode
- Pilih lanjutkan dengan menekan volume atas
- Sambungkan Hp ke computer dengan kabel Usb
- Buka odin V.3 dan lihat apakah di kolom ID:COM berwarna biru jika belum bewarna biru ulangi langkahnya dari no 3
- Jika ID:COM sudah berwarna biru berarti sudah siap ke tahap proses Flash
- Klik PDA / AP pada odin dan arahkan file firmware yang di Extrack tadi lalu pilih SMG130XXXopoikiXXX.md5 <---- Nama file extrack
- Tunggu sebentar hingga odin success menyiapkan file firmware
- Klik START di Odin Tunggu sampai proses selesai (PASS) Galaxy inti restart otomatis. selesai
Untuk Tutorial lengkap bisa di lihat disini : Flashing Samsung Mengunakan Odin3
Available link for download

Monday, September 5, 2016
Samsung SM J200GU Root File 100 Tested
Samsung SM J200GU Root File 100 Tested
Samsung SM-J200GU Root File 100% Tested

How To Root
1st. flash thish twrp-2.8.7.0-j2lte.img.tar with odin
2nd. install thish SuperSU-v2.60-20151205163135.zip with TWRP recovery
wifizoneforyou@yahoo.com
01711303925
FREE DOWNLOAD
Available link for download
Sunday, September 4, 2016
Tutorial Flash Samsung Galaxy V SM G313HZ Kitkat
Tutorial Flash Samsung Galaxy V SM G313HZ Kitkat

- Berikut alat flash yang harus di download sebelum melakukan Flash update :
- Usb driver disini atau samsung kies disini
- Odin v3 disini
- Firmware Samsung Galaxy V SM-G313HZ disini
Jika Alat tempur siap, ikuti panduan ini dengan benar :
- Install Usb Driver samsung atau samsung kies di Computer kamu.
- Extrack firmware win rar archive Galaxy V SM-G313HZ dengan win rar hingga ada file .md5
- Matikan galaxy kamu. tekan dan tahan tombol Vol bawah+Home+Power hingga muncul download mode
- Pilih lanjutkan dengan menekan volume atas
- Sambungkan Hp ke computer dengan kabel Usb
- Buka odin V.3 dan lihat apakah di kolom ID:COM berwarna biru jika belum bewarna biru ulangi langkahnya dari no 3
- Jika ID:COM sudah berwarna biru berarti sudah siap ke tahap proses Flash
- Klik PDA / AP pada odin dan arahkan file firmware yang di Extrack tadi lalu pilih G313HZXXXopoikiXXX.md5 <---- Nama file extrack
- Tunggu sebentar hingga odin success menyiapkan file firmware
- Klik START di Odin Tunggu sampai proses selesai (PASS) Galaxy inti restart otomatis. selesai
Untuk Tutorial lengkap bisa di lihat disini : Flashing Samsung Mengunakan Odin3
Available link for download
Root and Install CWM With Odin on SAMSUNG Galaxy Note 3 SM N900
Root and Install CWM With Odin on SAMSUNG Galaxy Note 3 SM N900
 |
| Root and Install CWM With Odin on SAMSUNG Galaxy Note 3 SM-N900 |
This tool is an auto root tool to make you root and install your phone easier. This would be really easy if you read and follow the instruction carefully. Are you ready to execute your Galaxy Note 3? lets follow the steps below:
How to root and install Galaxy Note 3 SM-N900
- Download and install USB driver SAMSUNG Galaxy Note in your computer, or you should have KIES on your computer
- This can loss your data and file, so back up your data and file first before do this
- Enable USB Debugging option by pressing Menu > Settings > Applications. Then navigate and tap Developer Options to ensure that USB Debugging is active
- Ensure that the battery of your Galaxy Note 3 carries more than 70% of charge
- Unzip and install Odin on your PC and switch your Samsung Galaxy Note 3 off.
- Boot it in Download mode: press and hold Volume Down, Power and Home buttons simultaneously. Once successfully connected, you will get a message in Odin saying Added!!. (In case you don’t get it, try another USB port. If that doesn’t help either, then re-install USB drivers).
- In Odin make sure that the Auto Reboot and F. Reset Time check boxes are the only options checked and nothing else is.
- Click on PDA button on Odin and locate the root file. Hit Start button to initiate the root process.
- Wait for your phablet to get rooted. When root tool installation is successfully completed, Odin ID:COM will turn green and Odin will show you a PASS message.
- Reboot your Note 3 and repeat the steps to flash CWM recovery file on your Note 3 SM-N900.
- Once done, disconnect Note 2 and reboot it again!
- Congrats ! your Galaxy Note 3 is now rooted via ClockWordMod recovery tool
Auto root package
Cwm recovery Note 3
Odin
Available link for download
Friday, September 2, 2016


Tutorial Flash Samsung Galaxy J1 SM J110G
Tutorial Flash Samsung Galaxy J1 SM J110G

- Berikut alat flash yang harus di download sebelum melakukan Flash update :
- Usb driver disini atau samsung kies disini
- Odin v3 disini
- Firmware Galaxy J1 SM-J110G disini
Jika Alat tempur siap, ikuti panduan ini dengan benar :
- Install Usb Driver samsung atau samsung kies di Computer kamu.
- Extrack firmware win rar archive Galaxy J1 SM-J110G dengan win rar hingga ada file .md5
- Matikan galaxy kamu. tekan dan tahan tombol Vol bawah+Home+Power hingga muncul download mode
- Pilih lanjutkan dengan menekan volume atas
- Sambungkan Hp ke computer dengan kabel Usb
- Buka odin V.3 dan lihat apakah di kolom ID:COM berwarna biru jika belum bewarna biru ulangi langkahnya dari no 3
- Jika ID:COM sudah berwarna biru berarti sudah siap ke tahap proses Flash
- Klik PDA / AP pada odin dan arahkan file firmware yang di Extrack tadi lalu pilih J110GXXXopoikiXXX.md5 <---- Nama file extrack
- Tunggu sebentar hingga odin success menyiapkan file firmware
- Klik START di Odin Tunggu sampai proses selesai (PASS) Galaxy inti restart otomatis. selesai
Untuk Tutorial lengkap bisa di lihat disini : Flashing Samsung Mengunakan Odin3
Available link for download
Thursday, September 1, 2016
SM J110H Unlocking Procedures
SM J110H Unlocking Procedures
Heres How to unlock SM-J110H on service Provider.
First thing first,Lets check the Specifications of this Smartphone.This smartphone is from Saudi Arabia and made by Samsung..
SM-J110H Keys Specs:
How To Unlock using Octopus Box Software:
1. Power on the phone.
2. Tap 7 times on Build number in Settings-About phone to enable Developer options,
go to Settings-Developer options and enable USB debugging.
3.Open Octopus Box Samsung Software
4.Select Spreadtrum
5.Select SM-J110H
6. Connect the phone to PC with USB cable, install drivers if needed.
7. Press Unlock button for direct unlock or Read codes to read security codes.
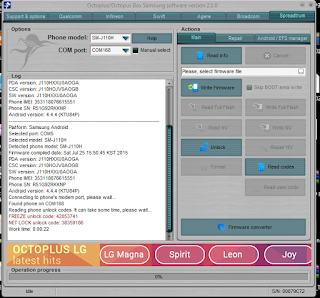
First thing first,Lets check the Specifications of this Smartphone.This smartphone is from Saudi Arabia and made by Samsung..
SM-J110H Keys Specs:
- 4.3-inch display, at 216 ppi / dpi (pixels per inch)
- 1.3GHz 2-core processor
- 0.512GB RAM
- 4GB internal memory
- 5 Megapixel main camera
- 1800-mAh battery
- Android 4.4 KitKat
How To Unlock using Octopus Box Software:
1. Power on the phone.
2. Tap 7 times on Build number in Settings-About phone to enable Developer options,
go to Settings-Developer options and enable USB debugging.
3.Open Octopus Box Samsung Software
4.Select Spreadtrum
5.Select SM-J110H
6. Connect the phone to PC with USB cable, install drivers if needed.
7. Press Unlock button for direct unlock or Read codes to read security codes.
Available link for download
Tuesday, August 30, 2016
Samsung SM 360H Clone Firmware Flash File 100 Tested
Samsung SM 360H Clone Firmware Flash File 100 Tested
SAMSUNG SM-360H MTK6572 4.4.2 READED AND TESTED FILE
Samsung SM-360H Clone Firmware Factory Firmware Flash File 4.4.2 Full Tested
Samsung SM-360H MTK6572 Clone Firmware Factory Flash File Update-Verson
Samsung SM-360H MTK6572 Clone Firmware Official Firmware 100% Tested
Samsung SM-360H MTK6572 Clone Firmware Latest Stock Firmware Free
Samsung SM-360H MTK6572 Clone Firmware Factory Flash File Working
Samsung SM-360H MTK6572 Clone Firmware Flash File Tested
Samsung SM-360H MTK6572 Clone Firmware Flsah File No Dead Risk 100% Tested
>>Without Password<<
Samsung SM-360H MTK6572 Clone Firmware Official Firmware 100% Tested
Samsung SM-360H MTK6572 Clone Firmware Latest Stock Firmware Free
Samsung SM-360H MTK6572 Clone Firmware Factory Flash File Working
Samsung SM-360H MTK6572 Clone Firmware Flash File Tested
Samsung SM-360H MTK6572 Clone Firmware Flsah File No Dead Risk 100% Tested
>>Without Password<<

File Version:4.4.2
Hello Gsm Firends
Yahoo Messenger Id:mr.raja51@yahoo.com
Facebook Id raja ahammed1
satbria bharamara kushtia
Any Problem Call Me +8801734481844
Your Need Samsung SM-360H Clone Tasted Firmware
Available link for download
Samsung SM N9600 MTK 6572 Officeil Firmware 100 Tested
Samsung SM N9600 MTK 6572 Officeil Firmware 100 Tested
Samsung SM-N9600 MTK-6572 Flash File
Letest File-4.4.2

wifizoneforyou@yahoo.com
01711-30-39-25
DOWNLOAD LINK
Available link for download
Repair Bootloop on Logo After Flashing on Samsung Galaxy J1 SM J100H
Repair Bootloop on Logo After Flashing on Samsung Galaxy J1 SM J100H
 |
| Repair Bootloop on Logo After Flashing on Samsung Galaxy J1 SM-J100H |
Overcoming Samsung J1 SM-J100H stuck on logo or what the people usually call it bootloop with flashing method. Samsung J1 hang on logo or this problem may happens when Samsung J1 camera flash is error when it switches on cannot access its main menu or homescreen. Problem like this are common because of the failure of the update process or it could be due to an error when installing application, it may because the applications we have installed does not match the Android version we have that makes our smartphone goes into bootloop.
We are not going to give Galaxy J1 review or Galaxy J1 price because we are going to focus to fix bootloop and flashing Samsung Galaxy J1 SM-J100H. Sometimes bootloop problems can also be overcome by doing Hard Reset in Recovery Mode, but if Hard Reset does not overcome bootloop, so there is another method to overcome it is by doing flashing.
In this article you will find Samsung Galaxy J1 flash file and Samsung J1 flash file download easily. This article can also overcome Samsung j1 camera flash if it is error. Beside overcoming bootloop, this can also cope other problems such as application stops, mobile data doesn’t work, hangs, getting slow, and other issues.
After flash method is completed, Samsung Galaxy J1 SM-J100H will return to normal, or as at the time you purchase it.
Remember that, in this article we are going to telling you how to flash Samsung J100 with odin, but before doing flash on Samsung Galaxy J1 SM-J100H you must prepare some materials required, they are; Samsung USB, Driver for your Samsung J100, Odin tool, and Firmware with specific type of yoru Samsung Galaxy J1 SM-J100H. The third above had been provided by me and you can download it bellow freely. Pay attention please, and follow the instruction carefully:
Files:
- Samsung USB Driver for Mobile Phones - Download
- Odin v3.09 - Download
- Firmware Samsung Galaxy J1 SM-J100H - Download
- Steps to Flash Samsung Galaxy J1 SM-J100H
- Extract Samsung USB Driver for Mobile Phones then install it on your PC/Laptop
- Extract also Odin v3.09 and firmware Samsung Galaxy J1 SM-J100H that has been downloaded
- Turn off Samsung Galaxy J100 (to ensure Samsung Galaxy J1 SM-J100H is truly off, please allow a few seconds).
- Then go to Download menu by holding Volume Down + Home + Power simultaneously until exit the last post warning.
- Furthermore, press Volume Up to select Continue and it will automatically go to the navigation Download Samsung Galaxy J1 SM-J100H
- Now connect Samsung Galaxy J1 to the PC/Laptop using USB Cable (use original USB Cable) then open Odin v3.09
- Furthermore, check Auto Reboot F and Erase All, then make sure Samsung Galaxy J1 detected Odin with green color and there is the last post ID:COMin the Odin tool v3.09
- Then click AP and looking for firmware of Samsung Galaxy J1 SM-J100H that has been extracted before, double click that firmware and it will automatic will be contained to Odin v3.09
- Furthermore, click Start in the Odin v.309 software and automatic flashing process will automatically runs. Wait until it is finished, then if it is finished, Samsung Galaxy J1 will come out to last post PASS! As shown below
- Flashing process takes less about 15 minutes.
Similarly, this article about fix bootloop on Samsung Galaxy J1 SM-J100H and we hope this article is useful for those who need this article to overcome bootloop problems.
Available link for download
Monday, August 29, 2016
Samsung SM J500G No Root Unlock By Z3x
Samsung SM J500G No Root Unlock By Z3x
Samsung SM-J500G No Root Unlock By Z3x

wifizoneforyou@yahoo.com
01711-30-39-25
Available link for download
Sunday, August 28, 2016
How to root Samsung Galaxy S6 edge SM G928T
How to root Samsung Galaxy S6 edge SM G928T

How to root Samsung Galaxy S6 edge+ SM-G928T
How to root Samsung Galaxy S6 edge+ SM-G928T with CF-Auto-Root using ODIN software.
The zip file is not included TWRP Custom recovery.
Step.
Download root file from here
Download Odin v3.09 here
Extract CF-Auto-Root- Zenltetmo-zenltetmo-smg928t.zip
Download Odin v3.09 here
Extract CF-Auto-Root- Zenltetmo-zenltetmo-smg928t.zip
Open Odin
In Option make sure to ticked Auto Reboot and F.Reset Time only
Turn off your Samsung Galaxy and put it to Download Mode or ODIN Mode:
In Option make sure to ticked Auto Reboot and F.Reset Time only
Turn off your Samsung Galaxy and put it to Download Mode or ODIN Mode:
To enter Download Mode Press and hold Volume Down key + Home Key then while pressing these keys Press and hold Power key,
Release all key when Download / Odin mode appears.
Connect your Samsung Galaxy to PC using USB Cable and Press Volume Up key.
Odin software will auto detect port of your device, after detected device, Click Start
Odin software will auto detect port of your device, after detected device, Click Start
wait for a moment.
After flashing finish the device will reboot.
Notes:
Use at your own risk, I’m not responsible for bricking your device.
Make sure you get the correct file. Using the incorrect file may brick your device.
If your target device has a custom firmware flash counter, CF-Auto-Root will trigger it. If you’re lucky, Triangle Away has support for your device and can be used to reset the counter.
If you have a KNOX-enabled device, using CF-Auto-Root will trip the KNOX WARRANTY VOID status !
If your device storage is encrypted, using CF-Auto-Root will wipe your data !
If you have locked bootloaders, flashing one of these will probably brick your device – with the exception of Nexus devices, which will usually automatically “OEM unlock” and wipe your data !
After flashing finish the device will reboot.
Notes:
Use at your own risk, I’m not responsible for bricking your device.
Make sure you get the correct file. Using the incorrect file may brick your device.
If your target device has a custom firmware flash counter, CF-Auto-Root will trigger it. If you’re lucky, Triangle Away has support for your device and can be used to reset the counter.
If you have a KNOX-enabled device, using CF-Auto-Root will trip the KNOX WARRANTY VOID status !
If your device storage is encrypted, using CF-Auto-Root will wipe your data !
If you have locked bootloaders, flashing one of these will probably brick your device – with the exception of Nexus devices, which will usually automatically “OEM unlock” and wipe your data !
Available link for download
Wednesday, August 24, 2016
Downlaod stock rom Samsung Galaxy J7 SM J700F SM J700H
Downlaod stock rom Samsung Galaxy J7 SM J700F SM J700H

Samsung Galaxy J7 SM-J700F Lollipop 5.1.1
SamsungGalaxy J7SM-J700H Lollipop 5.1.1
Available link for download
Cara Flash Samsung Galaxy J5 SM J500 Lolipop
Cara Flash Samsung Galaxy J5 SM J500 Lolipop

Tutorial / Cara Flashing Samsung Galaxy J5 SM-J500 ke Lolipop 5.0 karena kendala Matot Brick, Bootloop Virusan, aplikasi force close, kesalahan download, aplikasi error, touchscreen tidak sensitif, memory internal virusan, loading bootloop berulang-ulang, hingga mati total bisa dilakukan flash update firmware selama HH masih bisa terdeteksi di driver computer. atau anda juga bisa melakukan Factory Reset Samsung Galaxy J5 J500 dengan cara menekan tiga kombinasi tombol HH. pada saat posisi hp off tekan dan tahan tombol Vol Up+Home+Power hingga muncul gambar robot android. lalu lakukan wipe user data. wipe cahce dan reboot. tapi kadang ini tidak cukup membantu HH juga butuh di program ulang.
- Berikut alat flash yang harus di download sebelum melakukan Flash update :
- Usb driver disini atau samsung kies disini
- Odin v3 disini
- Firmware Galaxy J5 J500F disini
- Firmware Galaxy J5 J500H disini
- Firmware Galaxy J5 J500M disini
- Firmware Galaxy J5 J500G disini
Jika Alat tempur siap, ikuti panduan ini dengan benar :
- Install Usb Driver samsung atau samsung kies di Computer kamu.
- Extrack firmware win rar archive Samsung Galaxy J5 J500 dengan win rar hingga ada file .md5
- Matikan galaxy kamu. tekan dan tahan tombol Vol bawah+Home+Power hingga muncul download mode
- Pilih lanjutkan dengan menekan volume atas
- Sambungkan Hp ke computer dengan kabel Usb
- Buka odin V.3 dan lihat apakah di kolom ID:COM berwarna biru jika belum bewarna biru ulangi langkahnya dari no 3
- Jika ID:COM sudah berwarna biru berarti sudah siap ke tahap proses Flash
- Klik PDA / AP pada odin dan arahkan file firmware yang di Extrack tadi lalu pilih J500XXXopoikiXXX.md5 <---- Nama file extrack
- Tunggu sebentar hingga odin success menyiapkan file firmware
- Klik START di Odin Tunggu sampai proses selesai (PASS) Galaxy inti restart otomatis. selesai
Untuk Tutorial lengkap bisa di lihat disini : Flashing Samsung Mengunakan Odin3
Available link for download
Sunday, August 21, 2016
SM G530H Samsung Galaxy Grand Prime Unlocking Using Z3X Box
SM G530H Samsung Galaxy Grand Prime Unlocking Using Z3X Box
Below is the unlocking instructions of Samsung Galaxy Grand Prime using Z3X Box Software.
Very simple and easy!
UNLOCK INSTRUCTIONS:
Micro-USB cable:
1. Phone must be powered on.
2. Type *#0808# and select DM+MODEM+ADB.
3. Type *#9090# and choose DM/DUN over HSIC.
4. Reboot phone.
5. Connect USB cable, install drivers if needed.
6. Select Samsung diagnostic port in port settings.
7. Press Unlock button for direct unlock.

Very simple and easy!
UNLOCK INSTRUCTIONS:
Micro-USB cable:
1. Phone must be powered on.
2. Type *#0808# and select DM+MODEM+ADB.
3. Type *#9090# and choose DM/DUN over HSIC.
4. Reboot phone.
5. Connect USB cable, install drivers if needed.
6. Select Samsung diagnostic port in port settings.
7. Press Unlock button for direct unlock.
Available link for download
Saturday, August 20, 2016
Samsung Galaxy Note 5 SM N920C Unlocking Using Z3X Pro with Android Version 5 1 1
Samsung Galaxy Note 5 SM N920C Unlocking Using Z3X Pro with Android Version 5 1 1
These are the steps that you should follow to unlock your Samsung Galaxy Note 5 (SM-N920C).
Prerequisites:
1) To get started, take a complete backup of personal data in your smartphone using Samsung Kies or using similar application.
2) Next, download Samsung Galaxy Note 5 driver and install it in your computer. Only by installing USB driver, you will be able to connect your smartphone with the computer successfully.
3) Now you will need to enable Developer Options in your device by following this path: Settings -> About Phone -> Build Number (tap on it for 5-7 times). Once enabled, you will need to enable “OEM Unlocking” by following this path: Settings -> Developer Options -> OEM Unlocking (enable it for allowing the bootloader to be unlocked).
4) Make sure that your device has at least 50-60% battery backup in it before getting started with the rooting procedure. Also, ensure that you have disabled antivirus as they tend to interrupt the rooting procedure.
5.Z3X Samsung Tool PRO
Once you have finished all these prerequisites, you can move forward to the rooting and Unlocking tutorial given below.
For Rooting this device follow this Procedure>Tutorial To Root Samsung Galaxy Note 5:
Unlocking This Device
1.Open Z3X Samsung Tool PRO
2.Connect your device using USB Cable
3.Select Correct Unit
4.Select Unlock in the Tab
5.Select ADB in the Port
6.Now,Click Read Codes
7.Restart your Phone and Manually put generated codes in the device.

Prerequisites:
1) To get started, take a complete backup of personal data in your smartphone using Samsung Kies or using similar application.
2) Next, download Samsung Galaxy Note 5 driver and install it in your computer. Only by installing USB driver, you will be able to connect your smartphone with the computer successfully.
3) Now you will need to enable Developer Options in your device by following this path: Settings -> About Phone -> Build Number (tap on it for 5-7 times). Once enabled, you will need to enable “OEM Unlocking” by following this path: Settings -> Developer Options -> OEM Unlocking (enable it for allowing the bootloader to be unlocked).
4) Make sure that your device has at least 50-60% battery backup in it before getting started with the rooting procedure. Also, ensure that you have disabled antivirus as they tend to interrupt the rooting procedure.
5.Z3X Samsung Tool PRO
Once you have finished all these prerequisites, you can move forward to the rooting and Unlocking tutorial given below.
WARNING: I should not be held responsible for any damages happens to your device while following this rooting procedure. Also, rooting will void your warranty as well. So, beware of these things before getting started with the tutorial given below.
For Rooting this device follow this Procedure>Tutorial To Root Samsung Galaxy Note 5:
Unlocking This Device
1.Open Z3X Samsung Tool PRO
2.Connect your device using USB Cable
3.Select Correct Unit
4.Select Unlock in the Tab
5.Select ADB in the Port
6.Now,Click Read Codes
7.Restart your Phone and Manually put generated codes in the device.
Thats It!!!
Any Questions???Use the comment System Below!!!
Available link for download
How To Flash or Update SM G355H using Odin
How To Flash or Update SM G355H using Odin
Below is the Procedures How To Flash or Update SM-G355H using odin.
Download Odin v3.10.6
Extract Odin ZIP file
Open Odin v.3.10.6
Reboot Phone in Download Mode (press and hold Home + Power + Volume Down buttons)
Connect phone and wait until you get a blue sign in Odin
Add the firmware file to AP / PDA
Make sure re-partition is NOT ticked
Click the start button, sit back and wait few minutes
Do the Flashing of new Firmware if you have experienced this following Problem.
*Hangs
*Hangs in Logo
*Freezes
*Force Close
*or Just want to Update to the latest Android Version of your phone.
Download exact firmware of your phone from here.
Instructions
Extract (unzip) the firmware fileDownload Odin v3.10.6
Extract Odin ZIP file
Open Odin v.3.10.6
Reboot Phone in Download Mode (press and hold Home + Power + Volume Down buttons)
Connect phone and wait until you get a blue sign in Odin
Add the firmware file to AP / PDA
Make sure re-partition is NOT ticked
Click the start button, sit back and wait few minutes
Available link for download
Friday, August 19, 2016
Tutorial Cara Flashing Samsung Galaxy A3 SM A300H
Tutorial Cara Flashing Samsung Galaxy A3 SM A300H

Tutorial / Cara Flashing Samsung Galaxy A3 SM-A300H menggunakan Odin Flasher karena kendala seperti Matot HardBrick, Bootloop Virusan, aplikasi force close, kesalahan download, aplikasi error, touchscreen tidak sensitif, memory internal virusan, loading bootloop berulang-ulang, hingga mati total bisa dilakukan flash update firmware selama HH masih bisa terdeteksi di driver computer. atau anda juga bisa melakukan Factory Reset Galaxy A3 SM-A300H dengan cara menekan tiga kombinasi tombol HH. pada saat posisi hp off tekan dan tahan tombol Vol Up+Home+Power hingga muncul gambar robot android. lalu lakukan wipe user data. wipe cahce dan reboot. tapi kadang ini tidak cukup membantu HH juga butuh di program ulang.
- Berikut alat flash yang harus di download sebelum melakukan Flash update :
- Usb driver Download atau samsung kies Download
- Odin v3 Download
- Firmware Samsung Galaxy A3 SM-A300H Download
Jika Alat tempur siap, ikuti panduan ini dengan benar :
- Install Usb Driver samsung atau samsung kies di Computer kamu.
- Extrack firmware win rar archive Galaxy A3 SM-A300H dengan win rar hingga ada file .md5
- Matikan galaxy kamu. tekan dan tahan tombol Vol bawah+Home+Power hingga muncul download mode
- Pilih lanjutkan dengan menekan volume atas
- Sambungkan Hp ke computer dengan kabel Usb
- Buka odin V.3 dan lihat apakah di kolom ID:COM berwarna biru jika belum bewarna biru ulangi langkahnya dari no 3
- Jika ID:COM sudah berwarna biru berarti sudah siap ke tahap proses Flash
- Klik PDA / AP pada odin dan arahkan file firmware yang di Extrack tadi lalu pilih A3 SM-A300HXXXopoikiXXX.md5 <---- Nama file extrack
- Tunggu sebentar hingga odin success menyiapkan file firmware
- Klik START di Odin Tunggu sampai proses selesai (PASS) Galaxy inti restart otomatis. selesai
Untuk Tutorial lengkap bisa di lihat disini : Flashing Samsung Mengunakan Odin3
Available link for download
Thursday, August 18, 2016
How To Remove FRP Lock on Samsung J1 2016 SM J120H
How To Remove FRP Lock on Samsung J1 2016 SM J120H
Below is the Instruction you should do to remove FRP lock on your Samsung J1 (SM-J120H).
SM-J120h frp reset
After Downloading above files,Extract it in your Desktop
Now,Put Phone Download Mode


Pre-Requisites:
OdinSM-J120h frp reset
After Downloading above files,Extract it in your Desktop
Now,Put Phone Download Mode
- Turn off the device
- Press and hold Volume Down key + Home Key, while pressing these keys then press and hold Power key for a while
- Release all key when you see ODIN Mode / Download Mode
- When connected successfully, you will get a message in Odin saying Added!!. (In case you don’t get it, try another USB port. If that doesn’t help either, then re-install USB drivers).
In Odin make sure that the Auto Reboot and F. Reset Time check boxes are the only options checked and nothing else is.
Click on PDA on Odin, locate the sm_j120h_convert_to_j120f_frp_reset_by_renz.tar.md5 file and hit the Start button to initiate the update process.
When flashing update installation is successfully completed, on Odin ID:COM will turn green and Odin will show you a PASS message.
After finish flashing on ODIN,Open Z3X Samsung ToolPRO v25.7
Select [J120F]
Put Again In DOWNLOAD MODE
Connect your Phone to PC
Press Reset FRP/React/EE and wait until Done
Follow on Phone screen to continue using phone....
All the Credits goes to Renz Altajeros for the FRP file!!!
Available link for download
Wednesday, August 17, 2016
Tutorial Flash Samsung Galaxy Prime SM G530H
Tutorial Flash Samsung Galaxy Prime SM G530H

- Berikut alat flash yang harus di download sebelum melakukan Flash update :
- Usb driver disini atau samsung kies disini
- Odin v3 disini
- Firmware Samsung Galaxy Prime SM-G530H disini
Jika Alat tempur siap, ikuti panduan ini dengan benar :
- Install Usb Driver samsung atau samsung kies di Computer kamu.
- Extrack firmware win rar archive Galaxy Prime SM-G530H dengan win rar hingga ada file .md5
- Matikan galaxy kamu. tekan dan tahan tombol Vol bawah+Home+Power hingga muncul download mode
- Pilih lanjutkan dengan menekan volume atas
- Sambungkan Hp ke computer dengan kabel Usb
- Buka odin V.3 dan lihat apakah di kolom ID:COM berwarna biru jika belum bewarna biru ulangi langkahnya dari no 3
- Jika ID:COM sudah berwarna biru berarti sudah siap ke tahap proses Flash
- Klik PDA / AP pada odin dan arahkan file firmware yang di Extrack tadi lalu pilih G530HXXXopoikiXXX.md5 <---- Nama file extrack
- Tunggu sebentar hingga odin success menyiapkan file firmware
- Klik START di Odin Tunggu sampai proses selesai (PASS) Galaxy inti restart otomatis. selesai
Untuk Tutorial lengkap bisa di lihat disini : Flashing Samsung Mengunakan Odin3
Available link for download
Subscribe to:
Posts (Atom)