Showing posts with label using. Show all posts
Showing posts with label using. Show all posts
Thursday, September 8, 2016
Installing and using Xrecovery
Installing and using Xrecovery

Xrecovery is a tool that can be used to install new Roms, backup/restore your existing ROM,apply patches,batch install applications & many more things.
Its very easy to install and use.
Files:
Xrecovery.
Root Explorer.
Installation:
1.Root your phone.
2.Install Root Explorer.
4.Copy xrecovery folder to SD card.
3.Copy 3files from "/sdcard/xrecovery" folder to "/System/bin"
4.Reboot.
5.Keep taping the back (the rightmost one) button when Sony Ericsson is displayed.
6.You will enter xrecovery menu.
Using Xrecovery:
1.To move around in xRecovery you use the volume buttons, to select an item you press the Home button (the middle one), and to go back you press the Back button.
2.Use common sense!
First thing to do - Make Backup!! - View Post
Available link for download

HOW TO CHANGE THE BOOT LOGO ON MTK DEVICES USING LOGO BUILDER
HOW TO CHANGE THE BOOT LOGO ON MTK DEVICES USING LOGO BUILDER
HOW TO CHANGE THE BOOT LOGO ON MTK DEVICE USING LOGO BUILDER

One of the things On MTK devices the ability to customize your device to your very taste. Right from the booting up to shutting down.
Today I will be sharing with you a tutorial on how to change your boot logo on mtk device.
Logo.bin: this is the first image you see when your device boots up. It contains the first boot image and also all the battery charging icons. This file is found inside your backup folder that means you must have an mtk backup of your rom to access this file.
Logo_bin: this is the second image that appears when your device is booting up. This image appears very quickly just about 3 secs. You can find this image inside your phone. It’s located inside
/system/media/image/logo_bin.
Requirements:
Pc.
Mtk backup of your rom.
Logo builder. Download here.
File Manager. Preferably Root explorer. Download here.
Custom recovery. CWM OR TWRP
Sp Flashtool (optional) download here.
Brain
How to change logo.bin:1. First you have to copy the logo.bin file from your mtk backup folder to the desktop.
/system/media/image/logo_bin.
Requirements:
Pc.
Mtk backup of your rom.
Logo builder. Download here.
File Manager. Preferably Root explorer. Download here.
Custom recovery. CWM OR TWRP
Sp Flashtool (optional) download here.
Brain
How to change logo.bin:1. First you have to copy the logo.bin file from your mtk backup folder to the desktop.
2. Extract “LogoBuilder_v1.5.1”, open the folder and launch logo builder.


3. In the next screen that appears, just click on close.
4. Click on create project.

5. Select the logo you copied earlier and click open.

6. Select an empty folder or you create a folder where you will like to extract the files and click ok

7. The logo.bin will be extracted. You will see a copy in the logo builder window.

8. Go to the folder where you extracted the files and edit any of the images.

9. Make sure you use the same resolution and also rename the image you want to use to the same name as the one you want to replace.
10. Once you are through editing the images. Go back to the logo builder and click on make.


11. After re packing, a flashable zip and logo.bin file will be created.

12. Open the folder where you extracted the logo.bin and copy the update.zip file.
13. Paste the update.zip in the root directory of your sd-card and flash through recovery.
14. CONGRATULATIONS!!! You have just successfully changed your boot logo.
N.B:
“For advanced users, you can also flash the logo.bin you see in the folder with sp flash tool.
“It’s not compulsory the images you use are png, just rename any image to png.
“Make sure the file size of the image you are using is not too large.
Second Image.
How to change logo_bin:
1. Open the logo builder if you have closed it.
2. Click on the second BL as shown in the image below.

3. Select any image you want to use and click open (make sure the image resolution is the same resolution as your device).
4. Select the folder where you will like to save the image and click on save.
5. Now open the folder where you saved the file and copy it to your sd card.
6. On your phone use any root file explorer (preferably root explorer)
7. Copy and paste the logo_bin from your sd-card to /system/media/images/
8. That’s all. Now you are done.
Tip: you can also create the logo_bin by just dragging any image on to the logo builder.
Though this has been tested on different mtk devices without any error. 9jarom won’t be held responsible for any damage done to your device.
Credit goes to KADAN. the developer of this software.
If you have any question, drop it in the comment box.
If this has been helpful don’t forget to share
Available link for download
Tuesday, September 6, 2016
How to Remove Pattern Password on LG F350L using Octopus Box
How to Remove Pattern Password on LG F350L using Octopus Box
Very simple when you have a Octopus Box Software!
Remove SD and SIM cards from the phone;
Put the phone into Emergency mode;
Install necessary driver;
Click "Reset Screen Lock" button;
Follow software instructions (prompts).

Remove SD and SIM cards from the phone;
Put the phone into Emergency mode;
Install necessary driver;
Click "Reset Screen Lock" button;
Follow software instructions (prompts).
Available link for download
Friday, September 2, 2016
How To Flash Cherry Mobile Sonic On Stock Firmware Using Sp Flash Tools
How To Flash Cherry Mobile Sonic On Stock Firmware Using Sp Flash Tools
How To Flash Cherry Mobile Sonic On Stock Firmware Using Sp Flash Tools
Heres How
Proceed Flashing via SP Flash Tool
DOWNLOAD Tools,Firmware etc... below:
SP Flash Tool HERE
Sonic Firmware HERE
USB Driver HERE
1. Install USB drivers
2. Extract Sonicstockrom.zip
3. Extract SPflashtool.rar file run SP Flash Tool v3.1222.00.exe(run as admin for win7)
4. Select "Scatter-Loading" button and locate MT6575_Android_scatter.txt
5. Once loaded Select "Download"
6. Then turn off phone and remove battery, put back battery then hold volume down then plug the USB Cable Wait Until Detected and Finish Flashing.


Finish Product


Available link for download
O 8 52 Unlocking Using Sigma Box
O 8 52 Unlocking Using Sigma Box
Heres the way you can unlock your O+ 8.52 to any SIM Provider in your Country!
Prerequisite:
Procedure
1. Open SigmaKey then choose MTK as the platform
2. Turn-off the phone and insert usb cable while pressing power switch
it should be stuck on o+ logo.
3. Choose correct comport , press Direct Unlock then wait for a seconds and your done

Prerequisite:
- Mini USB Cable
- PC
- Sigma Box
Procedure
1. Open SigmaKey then choose MTK as the platform
2. Turn-off the phone and insert usb cable while pressing power switch
it should be stuck on o+ logo.
3. Choose correct comport , press Direct Unlock then wait for a seconds and your done
Available link for download
Thursday, September 1, 2016
Using Flash tool to install ftf files
Using Flash tool to install ftf files
1. Install Flashtool.
2. Copy the *.ftf files that you `ve downloaded to firmwares folder from Flashtool.
3. Click "Flash" button from flashtool and select the *.ftf file firmware and click "OK"
4. Relax and wait a while. When the proccess is completed you will get a popup message. (don`t click on that!!!)
5. Unplug your USB cable from PC.
Power off your phone.
Press back button and keep your finger on button.
Plug USB cable to PC.
Check if the green LED appears.
On popup message press "OK" button.
When "Found at USB/........" appear on flash tool you may release "back button", sit down, relax and wait.

6. IF the "Start Flashing" message appear everything`s ok if not...repeat. Sitdown and relax.

7. When last message appear unplug/plug USB cable.
8.Restart Phone.
9.Done.:)
-original guide by Ricardo Rendeiro.
Available link for download
Sunday, August 28, 2016
How To Flash Cherry Mobile Sapphire Using Research Download Firmware Download Link
How To Flash Cherry Mobile Sapphire Using Research Download Firmware Download Link
 |
| How To Flash Cherry Mobile Sapphire |
Flash Your Cherry Mobile Sapphire Using Research Download if you experiencing bootloop in your phone like Phone freezes,Hangs,hang in logo and No boot.
If above mentions is your problem,You are in the right place because i want to share here the Firmware/Pac file of this phone and How to Flash it using Research Download.
Download:
Cherry Mobile Sapphire Firmware
Research Download
Refer To this Post on How To Flash Spd Chips Using Research Download
The Boot Mode of this Phone on Flashing is Volume Down
Disclaimer:Always Do at your own risks
Available link for download
How To Remove Privacy Lock on O 8 38 using Volcano Box
How To Remove Privacy Lock on O 8 38 using Volcano Box
These are the steps that you should follow to Remove Privacy Lock on O+ 8.38 using Volcano Box.First thing first,these software is not free,only professional unlocker have this.
Base on my experience,removing Privacy Lock using Volcano Box only works in this version V2.9.9.
So download this version in there support...
Heres What To Do:
1.Open Volcano Box V2.9.9
2.Open Android V2.2
3.Select MTK Android
4.USB Mode
5.Click Read Info and Connect USB Cable while the phone is OFF
6.Then,Unlock Theft and Connect USB Cable while the phone is OFF.

Base on my experience,removing Privacy Lock using Volcano Box only works in this version V2.9.9.
So download this version in there support...
Heres What To Do:
1.Open Volcano Box V2.9.9
2.Open Android V2.2
3.Select MTK Android
4.USB Mode
5.Click Read Info and Connect USB Cable while the phone is OFF
6.Then,Unlock Theft and Connect USB Cable while the phone is OFF.
Available link for download
Sunday, August 21, 2016
SM G530H Samsung Galaxy Grand Prime Unlocking Using Z3X Box
SM G530H Samsung Galaxy Grand Prime Unlocking Using Z3X Box
Below is the unlocking instructions of Samsung Galaxy Grand Prime using Z3X Box Software.
Very simple and easy!
UNLOCK INSTRUCTIONS:
Micro-USB cable:
1. Phone must be powered on.
2. Type *#0808# and select DM+MODEM+ADB.
3. Type *#9090# and choose DM/DUN over HSIC.
4. Reboot phone.
5. Connect USB cable, install drivers if needed.
6. Select Samsung diagnostic port in port settings.
7. Press Unlock button for direct unlock.

Very simple and easy!
UNLOCK INSTRUCTIONS:
Micro-USB cable:
1. Phone must be powered on.
2. Type *#0808# and select DM+MODEM+ADB.
3. Type *#9090# and choose DM/DUN over HSIC.
4. Reboot phone.
5. Connect USB cable, install drivers if needed.
6. Select Samsung diagnostic port in port settings.
7. Press Unlock button for direct unlock.
Available link for download
Saturday, August 20, 2016
Samsung Galaxy Note 5 SM N920C Unlocking Using Z3X Pro with Android Version 5 1 1
Samsung Galaxy Note 5 SM N920C Unlocking Using Z3X Pro with Android Version 5 1 1
These are the steps that you should follow to unlock your Samsung Galaxy Note 5 (SM-N920C).
Prerequisites:
1) To get started, take a complete backup of personal data in your smartphone using Samsung Kies or using similar application.
2) Next, download Samsung Galaxy Note 5 driver and install it in your computer. Only by installing USB driver, you will be able to connect your smartphone with the computer successfully.
3) Now you will need to enable Developer Options in your device by following this path: Settings -> About Phone -> Build Number (tap on it for 5-7 times). Once enabled, you will need to enable “OEM Unlocking” by following this path: Settings -> Developer Options -> OEM Unlocking (enable it for allowing the bootloader to be unlocked).
4) Make sure that your device has at least 50-60% battery backup in it before getting started with the rooting procedure. Also, ensure that you have disabled antivirus as they tend to interrupt the rooting procedure.
5.Z3X Samsung Tool PRO
Once you have finished all these prerequisites, you can move forward to the rooting and Unlocking tutorial given below.
For Rooting this device follow this Procedure>Tutorial To Root Samsung Galaxy Note 5:
Unlocking This Device
1.Open Z3X Samsung Tool PRO
2.Connect your device using USB Cable
3.Select Correct Unit
4.Select Unlock in the Tab
5.Select ADB in the Port
6.Now,Click Read Codes
7.Restart your Phone and Manually put generated codes in the device.

Prerequisites:
1) To get started, take a complete backup of personal data in your smartphone using Samsung Kies or using similar application.
2) Next, download Samsung Galaxy Note 5 driver and install it in your computer. Only by installing USB driver, you will be able to connect your smartphone with the computer successfully.
3) Now you will need to enable Developer Options in your device by following this path: Settings -> About Phone -> Build Number (tap on it for 5-7 times). Once enabled, you will need to enable “OEM Unlocking” by following this path: Settings -> Developer Options -> OEM Unlocking (enable it for allowing the bootloader to be unlocked).
4) Make sure that your device has at least 50-60% battery backup in it before getting started with the rooting procedure. Also, ensure that you have disabled antivirus as they tend to interrupt the rooting procedure.
5.Z3X Samsung Tool PRO
Once you have finished all these prerequisites, you can move forward to the rooting and Unlocking tutorial given below.
WARNING: I should not be held responsible for any damages happens to your device while following this rooting procedure. Also, rooting will void your warranty as well. So, beware of these things before getting started with the tutorial given below.
For Rooting this device follow this Procedure>Tutorial To Root Samsung Galaxy Note 5:
Unlocking This Device
1.Open Z3X Samsung Tool PRO
2.Connect your device using USB Cable
3.Select Correct Unit
4.Select Unlock in the Tab
5.Select ADB in the Port
6.Now,Click Read Codes
7.Restart your Phone and Manually put generated codes in the device.
Thats It!!!
Any Questions???Use the comment System Below!!!
Available link for download
How To Flash or Update SM G355H using Odin
How To Flash or Update SM G355H using Odin
Below is the Procedures How To Flash or Update SM-G355H using odin.
Download Odin v3.10.6
Extract Odin ZIP file
Open Odin v.3.10.6
Reboot Phone in Download Mode (press and hold Home + Power + Volume Down buttons)
Connect phone and wait until you get a blue sign in Odin
Add the firmware file to AP / PDA
Make sure re-partition is NOT ticked
Click the start button, sit back and wait few minutes
Do the Flashing of new Firmware if you have experienced this following Problem.
*Hangs
*Hangs in Logo
*Freezes
*Force Close
*or Just want to Update to the latest Android Version of your phone.
Download exact firmware of your phone from here.
Instructions
Extract (unzip) the firmware fileDownload Odin v3.10.6
Extract Odin ZIP file
Open Odin v.3.10.6
Reboot Phone in Download Mode (press and hold Home + Power + Volume Down buttons)
Connect phone and wait until you get a blue sign in Odin
Add the firmware file to AP / PDA
Make sure re-partition is NOT ticked
Click the start button, sit back and wait few minutes
Available link for download
Wednesday, August 17, 2016
How to Root O 8 38 using iRoot
How to Root O 8 38 using iRoot
These are the instructions to root O+ 8.38 using iRoot software.Just Follow below step by steps procedures to root your O+ 8.38.
Downloads:
iRoot
Drivers Auto-installer
Requirements:Your O+ 8.38 should have atleast 50-60 percent of battery to perform the rooting process.
2.Download and Install iRoot in your PC
3.Open iRoot Software
4.Connect Your phone to the USB Cable and wait until detected by iRoot
5.After fully detected by iRoot,Click the root button
6.Wait now until root process success and your phone will automatically reboot
7.Now,to make sure you have successfully rooted your O+ 8.38,Open applications menu on your O+ 8.38 and find Kinguser App.If this app exist on your phone then it means you have successfully rooted your device.Congratulations.

Downloads:
iRoot
Drivers Auto-installer
Requirements:Your O+ 8.38 should have atleast 50-60 percent of battery to perform the rooting process.
Root O+ 8.38 Using iRoot
1.Download and Install the drivers of your phone2.Download and Install iRoot in your PC
3.Open iRoot Software
4.Connect Your phone to the USB Cable and wait until detected by iRoot
5.After fully detected by iRoot,Click the root button
6.Wait now until root process success and your phone will automatically reboot
7.Now,to make sure you have successfully rooted your O+ 8.38,Open applications menu on your O+ 8.38 and find Kinguser App.If this app exist on your phone then it means you have successfully rooted your device.Congratulations.
Available link for download
Monday, August 15, 2016
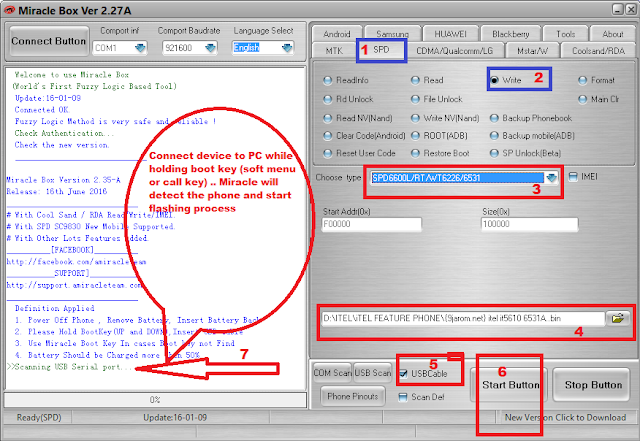
Tutorial How To Flash iTEL Feature Phonez Using Miracle Box
Tutorial How To Flash iTEL Feature Phonez Using Miracle Box
How To Flash iTEl Feature Phone Using Miracle Box
This a tutorial on how to flash itel feature phone using miracle box
Requirment :
- Miracle box or Any other Chinese Tools
- SPD Feature PhoneS
- USB CABLE
- Computer
- Brain
Flash Tutorial:
How to flash iTEl devices with .pac file using researchdownload & UpgradeDownload Tool.
click here
How to flash iTEL Feature phones with .bin file using Miracle Box below >>
Launch Miracle Box
Click on SPD tab
Tick Write
Under Choose type, Select the chip of the device you want to flash {6531 xxxx}
Click the small yellow folder
Navigate to the ROM/Firmware folder and select the bin file
Click Start button
You will see Scanning USB Serial port...
Connect device to PC while holding boot key (soft menu or call key)
Miracle will detect the phone and start flashing process
When you see Done! Flashing process is complete
Disconnect and boot up phone
Picture Guide .

Available link for download
Sunday, August 14, 2016
How To Flash HUAWEI Y300 Using SD Firmware Update With Firmware Guide
How To Flash HUAWEI Y300 Using SD Firmware Update With Firmware Guide
How To Flash HUAWEI Y300 Using SD Firmware Update With Firmware
Problem:
HUAWEI Y300 Hang On Logo Done!Procedure:
Download Firmware HERE
Put "dload" folder from archive on formatted micro-sd cards ROOT
Put micro-sd card into phone
Start phone in download mode = Press the VOLUME UP and VOLUME DOWN key, and then press the
POWER key to power on the phone and enter the Software Upgrade Mode
(taken from upgrade manual - which is found in archive, pdf ... )
Wait for finish ...
P.s. if not accepting firmware - means its not international version ....
 |

FINISHED PRODUCT:


Credits to the owner of this images kean lopez i have no time to take pictures on my own,I also base on his post in gsmsandwich on How To Flash HUAWEI Y300 Using SD Firmware Update With Firmware!
Available link for download
Friday, August 12, 2016
How To Create Custom Boot Logo Mtk Devices Using WiselinkTool
How To Create Custom Boot Logo Mtk Devices Using WiselinkTool
How to create custom boot logo on Mtk Devices Using WiselinkTool
This is just another tutorial on how to create a custom boot logo like the one in the image above for MTK devices using WiseLink Tool. Its easy and straight forward. Just watch the video or follow the tutorial below.

Last Time i post a Tutorial on how to change boot logo on mtk device
Logo.bin: this is the first image you see when your device boots up. It contains the first boot image and also all the battery charging icons. This file is found inside your backup folder that means you must have an mtk backup of your rom to access this file.
Requirements:


Install mtk mt65xx drivers
Download and install WiseLink Tool from here
Stock ROM of the phone you want to flash (optional)
NB: You can also extract logo.bin from devce using Miracle Box or MTK Droid Tools.
SP Flash Tool to flash the new logo.bin created
Design the image you will want to be the new logo of your device
Steps:
Launch WiseLinkTool
Click on Custom tab
Click LOGO button
Navigate to the Stock ROM folder and select logo.bin file
After a few seconds, the stock logo will be loaded.
Now click on Replace Boot Logo button and select the custom image you designed
Again click on Replace Android Logo and select the custom image you design
After replacing the image for both Boot Logo and Android Logo,
Click on Save LOGO button
Select path and click save button.
You have now succeeded in creating a logo.bin file
To flash this new logo.bin file to the device,
Copy the newly created to the stock rom folder (replace old one)
Launch SP Flash Tool or WiseLinkTool
Click on Scatter Loader
Select Scatter file
Tick ONLY LOGO
Click Download button
Connect device and wait for flash process to complete -> takes about few secs
Reboot your phone
Done.
If you have any question, drop it in the comment box.
If this has been helpful don’t forget to share
Available link for download
Thursday, August 11, 2016
MyPhone Ocean Lite Firmware Download Link And How To Hard Reset And How To Flash Firmware Using Sp Flash Tool
MyPhone Ocean Lite Firmware Download Link And How To Hard Reset And How To Flash Firmware Using Sp Flash Tool
MyPhone Ocean Lite Specs
Android 4.2 Jelly Bean4-inch capacitive display (480×800 WVGA), ~233ppi
1GHz dual core MediaTek MT6572M processor
Mali-400 MP1 GPU
microSD support up to 32GB
3.2-megapixel main camera, with fixed focus and LED flash
0.3-megapixel (VGA) front camera
Wi-Fi 802.11 a/b/g/n, Wi-Fi hotspot
2G: EDGE, GPRS
No 3G (to be verified)
Bluetooth
GPS, A-GPS
Dual SIM/Dual Standby

You Can Have it for ONLY 2999 Pesos
Download Here
MyPhone Ocean Lite Firmware password-Mobilesupport
How To Flash Firmware Using Sp Flash Tools
1.Download Sp Flash Tool
2.Open SP Flash Tools
3.Load scatter file
4.Then select download only
5.Then click download
6.Insert battery on phone then insert usb cable then until success
7.When Successfully flash you can see a window with check mark

How to Hard Reset Using Hardware Keys
Perform A Hard Reset Using Hardware keys if you forgot your Pattern Password or Any Related Phone Password,By doing this all your data save in phone will completely deleted,so be sure you have already back-up your important data.Make sure also that the battery is fully Charge.
1. Turn OFF your Phone
2. Hold and Press Volume UP,Volume Down and Power Botton (Release all after you see "Up Recovery Menu/Down Fastboot)
3. Press Volume Up to go to Android System Recovery
4.Select "wipe data/factory reset" using Volume Down,Left Sensitive keys to confirm
5.Reboot System
6.Follow on screen to continue using phone
Thats It
Something Wrong in my Post Feel Free to Ask using Comment Below!
Available link for download
Subscribe to:
Posts (Atom)